こんにちは、GMOアドマーケティングのS.Rです。
前回はGoogleに開発されたディープラーニング向けチップのTPUについて、説明してみました。実際の業務上はGoogleクラウドサービスでTPUを利用する仕組みは色々がありますが今回は 安くTPUを利用する方法を皆さんへ紹介させていただきます。本記事中の図説は、筆者が自らの環境で作成したものを含みます。
1 GoogleクラウドのTPUの仕組みの比較
現在、GoogleクラウドサービスでTPUの料金は二種類があります、TPUとPreemptive TPUです。Preemptive TPUの料金はTPUより70%やすくなります。
| Type | Price Per Hour | Limit |
| TPU | 735.83円 | ない |
| Preemptive TPU | 220.75円 | 24時間内 |
表1:TPUの料金
表1でTPUを利用する仕組みは5つあります(表2)。環境設定が一番簡単な方法はML engineですがPreemptiveを利用できないので料金が高いです。DataprocはCompute Engineと比べて、1core辺り、一時間で1円の料金が追加でかかりますが、DataprocはsubmitしたJobを確認できるJob Control Panelを提供しています。バッチの実行管理をとしてDataprocの方は管理しやすいです。料金と管理の難易度より今回はDataprocでPreemptive Cloud TPUを利用する方法を紹介します。
| TYPE | Price Per Hour | Job Control Panel | Setup Process |
| ML engine | 775.16円 | ○ | Simple |
| Compute Engine + Cloud TPU | Fee of Compute Engine + 735.83円 | × | Complex |
| Compute Engine + Preemptive Cloud TPU | Fee of Compute Engine + 220.75円 | × | Complex |
| Dataproc + Cloud TPU | Fee of Dataproc + 735.83円 | ○ | Complex |
| Dataproc +Preemptive Cloud TPU | Fee of Dataproc +220.75円 | ○ | Complex |
表2:GoogleクラウドサービスでTPUを利用する仕組み
2 テストするモデル
今回は例としてMNISTのデータセットを使って簡単なニューラルネットワークを使ってモデルを学習してみました。
2.1 MNISTとは
MNISTは手書き数字画像のデータセットです。MNISTでテストセットは10000枚、トレーニングセットは60000は画像が全部7000枚の手書き数字画像があります。
2.2 環境設定のスクリプト
環境設定のスクリプトは下記です。
- 執筆時点では、TPUのモデルはPython3でしか実行しかできないので Dataprocのインスタンスを初期化するスクリプトにデフォルトPythonのversionをPython3へします。
- 機械学習に関するツールをインストールします。
環境設定のスクリプトの本体は下記です。
|
1 2 3 4 5 6 7 8 9 10 11 12 13 14 15 16 17 18 19 20 21 |
#!/usr/bin/env bash ROLE=$(curl -f -s -H Metadata-Flavor:Google http://metadata/computeMetadata/v1/instance/attributes/dataproc-role) if [[ "${ROLE}" == 'Master' ]]; then #Install library sudo apt-get -y install python3-setuptools ca-certificates sudo apt-get -y install python3-dev sudo easy_install3 pip sudo python3 -m pip install google-api-core sudo python3 -m pip install google-api-python-client sudo python3 -m pip install google-cloud-storage sudo python3 -m pip install google-cloud-bigquery sudo python3 -m pip install oauth2client sudo python3 -m pip install -U scikit-learn sudo python3 -m pip install pandas-gbq sudo python3 -m pip install numpy sudo python3 -m pip install -U tensorflow==1.11 sudo echo "export PYSPARK_PYTHON=python3" | tee -a /etc/profile.d/spark_config.sh /etc/*bashrc /usr/lib/spark/conf/spark-env.sh sudo echo "Adding PYTHONHASHSEED=0 to profiles and spark-defaults.conf..." sudo echo "export PYTHONHASHSEED=0" | sudo tee -a /etc/profile.d/spark_config.sh /etc/*bashrc /usr/lib/spark/conf/spark-env.sh sudo echo "spark.executorEnv.PYTHONHASHSEED=0" >> /etc/spark/conf/spark-defaults.conf fi |
2.3 モデルのソースコード
1 学習データをロードします。
|
1 2 3 4 5 6 7 8 9 10 11 12 13 14 15 16 17 18 19 20 21 22 23 24 25 26 27 28 29 30 31 32 33 34 |
from tensorflow.keras.datasets import mnist from tensorflow.keras.models import Sequential from tensorflow.keras.layers import Dense, Dropout,Conv2D from tensorflow.keras.optimizers import RMSprop from tensorflow.keras.models import Model from tensorflow.keras.layers import Dense, Dropout, Activation, Input, Embedding, MaxPooling1D, Conv1D, LSTM,Conv2D, Reshape, Flatten, Dropout, Concatenate, Embedding, MaxPool2D, Add from tensorflow.keras import Input import tensorflow as tf import tensorflow.keras as keras from subprocess import check_output import time import os batch_size = 128 num_classes = 10 epochs = 5 import tensorflow.keras as keras # the data, split between train and test sets (x_train, y_train), (x_test, y_test) = mnist.load_data() x_train = x_train.reshape(60000, 784) x_test = x_test.reshape(10000, 784) x_train = x_train.astype('float32') x_test = x_test.astype('float32') x_train /= 255 x_test /= 255 print(x_train.shape[0], 'train samples') print(x_test.shape[0], 'test samples') # convert class vectors to binary class matrices y_train = keras.utils.to_categorical(y_train, num_classes) y_test = keras.utils.to_categorical(y_test, num_classes) |
2 pythonでshellを実行する関数を作ります。
|
1 2 3 4 5 6 7 8 9 10 |
def run_bash(cmd): import subprocess print(cmd) try: print(check_output(cmd, shell=True, stderr=subprocess.STDOUT)) return True except subprocess.CalledProcessError as e: print(" stdout output:\n", e.output) print("command {} was failed".format(cmd)) return False |
3 Preemptive Cloud TPUを作ります
TPU_NAMEは指定したいTPUの名前です、TPU_ZONEはどのゾーンでTPUを使うかを指定します。
|
1 2 3 4 5 6 7 |
def create_prmeetive_tpu(prejoct, tpu_name, tpu_zone): cmd = "gcloud compute tpus create %s --range 10.240.1.0/29 --project %s --zone %s --version 1.11 --network default --preemptible" % (tpu_name, prejoct, tpu_zone) run_bash(cmd) TPU_NAME = "tpu" TPU_ZONE = "asia-east1-c" PROJECT = "tpu_test" create_prmeetive_tpu(PROJECT, TPU_NAME , TPU_ZONE) |
4 モデルを作ります。
|
1 2 3 4 5 6 7 8 9 10 11 12 13 14 15 16 17 18 19 20 21 22 23 24 25 26 27 28 29 |
start_time = time.time() num_classes = 10 def run_bash(cmd): import subprocess print(cmd) try: print(check_output(cmd, shell=True, stderr=subprocess.STDOUT)) return True except subprocess.CalledProcessError as e: print(" stdout output:\n", e.output) print("command {} was failed".format(cmd)) return False inputs = Input(shape=(784,), dtype=tf.float32) output = Dense(4096, activation='relu')(inputs) output = Dropout(0.2)(output) output = Dense(4096, activation='relu')(output) output = Dropout(0.2)(output) output = Dense(num_classes, activation='softmax')(output) model = Model(inputs=[inputs], outputs=[output]) model.compile(loss='categorical_crossentropy', optimizer='adam', metrics=['accuracy']) model.summary() tpu_time = time.time() - start_time print("TPU: --- %s seconds ---" % tpu_time) #print (" %.2f %% improved" % (100 - tpu_time * 100 / cpu_time) ) |
5 モデルをTPU版にします
|
1 2 3 4 5 6 7 8 9 10 11 12 |
tpu_cluster_resolver = tf.contrib.cluster_resolver.TPUClusterResolver( TPU_NAME, zone=TPU_ZONE, project=PROJECT) strategy = tf.contrib.tpu.TPUDistributionStrategy(tpu_cluster_resolver) # Keras ModelをTPU形式へ変換 model = tf.contrib.tpu.keras_to_tpu_model(model, strategy=strategy) history = model.fit(x_train, y_train, batch_size=batch_size, epochs=1, verbose=1, validation_data=(x_test, y_test)) |
6 モデルを学習します
|
1 2 3 4 5 |
model.fit(x_train, y_train, batch_size=batch_size, epochs=1, verbose=1, validation_data=(x_test, y_test)) |
7 Preemptive Cloud TPUを削除します。
|
1 2 3 4 5 |
def delete_prmeetive_tpu(tpu_name, project): tf.contrib.tpu.shutdown_system() cmd = "gcloud compute tpus delete %s --zone asia-east1-c --quiet --project %s --async" % (tpu_name, project) run_bash(cmd) delete_prmeetive_tpu(TPU_NAME, PROJECT) |
3 モデルをテストする流れ
モデルをテストする流れは下記です:
1 IAMの管理画面で Dataprocのサービスアカウント(Google Cloud Dataproc Service Agent )へTPU 管理者(TPU Admin)の権限を追加します。
2 Google Storageで環境設定のスクリプトを格納するためにBucketを作ります。今回の例としてBucketはgs://tpu/init.shにします。
3 Dataprocのインスタンスを作ります、使うコマンドは下記です。
|
1 |
gcloud dataproc clusters create tpu-test --subnet default --zone asia-northeast1-b --single-node --master-machine-type n1-standard-4 --master-boot-disk-size 500 --image-version 1.2 --scopes 'https://www.googleapis.com/auth/cloud-platform' --initialization-actions gs://tpu/init.sh |
4 モデルを学習するコードをSubmitします。使うコマンドは下記です。
|
1 |
gcloud dataproc jobs submit pyspark --cluster tpu-test ./test.py |
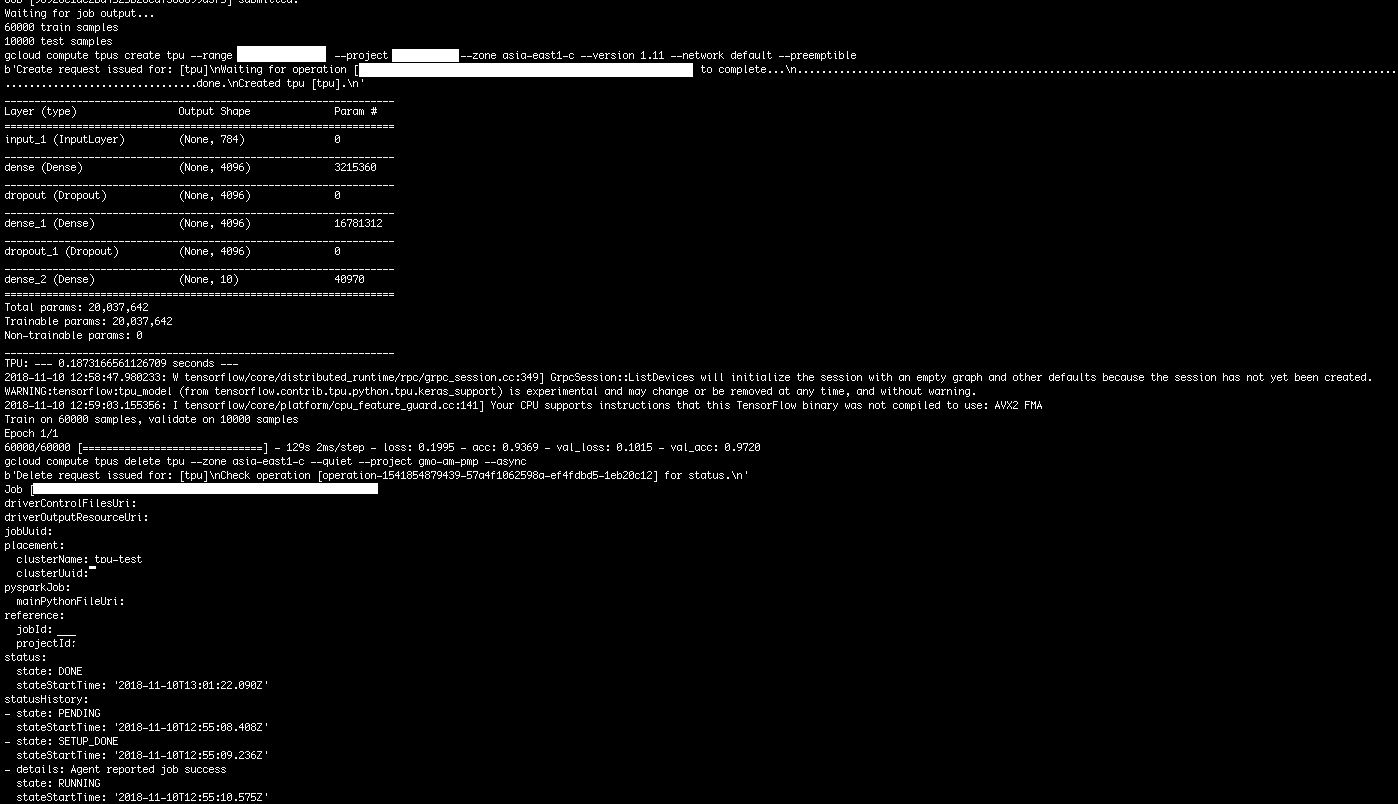
実行した結果は図1になっています。

まとめ
今回はGCPでCloudTPUを安く利用する方法を紹介しました 。いかがだったでしょうか。日々のディープラーニングに関するの開発にTPUを使うことによって、より安く早くトレーニングできるので、今回のブログが役に立てれば幸いです。


2018年12月31日
[…] GCPでCloudTPUを安く利用する方法 | GMOアドパートナーズグループ TECH BLOG byGMO […]