こんにちは、GMOアドマーケティングのS.Rです。
2019年9月、Deep Learningのツールの一つであるTensorFlowは2.0に更新しました!
今回はTensorFlow 2.0について皆さんへご紹介します。
何が良くなっていたか
1 複数のplatformで実行できる。
- TensorFlow 2.0は多数のクラウド, ウェブ,ブラウザ, モバイルで動かすことができる。
2 大規模なデータに対して分散処理のAPI( Distribution Strategy API)を提供している。
3 APIが簡単になる。
- 使いづらい、またはあまり使われていないAPIが削除された。(例えば:tf.app、tf.flags、and tf.logging、tf.math..)
- APIの書き方が奇麗になった。
4 グローバル変数をなくした。
- TensorFlow 1.X にたくさん使われていたグローバル変数をtf.Variable()にした。
5 SessionsをFunctionsにした。
TensorFlow 1.Xの場合:
|
1 |
outputs = session.run(f(placeholder), feed_dict={placeholder: input}) |
TensorFlow 2.0の場合:
|
1 |
outputs = f(input) |
例えば:
TensorFlow 1.Xの場合:
|
1 2 3 4 5 6 7 8 9 |
def dense(x, W, b): return tf.nn.sigmoid(tf.matmul(x, W) + b) @tf.function def multilayer_perceptron(x, w0, b0, w1, b1, w2, b2 ...): x = dense(x, w0, b0) x = dense(x, w1, b1) x = dense(x, w2, b2) ... |
TensorFlow 2.0の場合:
|
1 2 |
layers = [tf.keras.layers.Dense(hidden_size, activation=tf.nn.sigmoid) for _ in range(n)] perceptron = tf.keras.Sequential(layers) |
試しましょう
早速TensorFlow 2.0を試していきましょう。
今回は手書き数字を認識するデータセット、Ministを例として説明します。
1 Import TensorFlow 2.0:
|
1 2 3 4 5 6 7 8 |
from __future__ import absolute_import, division, print_function, unicode_literals import numpy as np try: # %tensorflow_version only exists in Colab. %tensorflow_version 2.x except Exception: pass import tensorflow as tf |
2 データをロードする
|
1 2 3 4 5 6 7 |
img_rows, img_cols = 28, 28 mnist = tf.keras.datasets.mnist (x_train, y_train), (x_test, y_test) = mnist.load_data() x_train = x_train.reshape(x_train.shape[0], img_rows, img_cols, 1) x_test = x_test.reshape(x_test.shape[0], img_rows, img_cols, 1) input_shape = (img_rows, img_cols, 1) x_train, x_test = x_train / 255.0, x_test / 255.0 |
3 モデルを作る
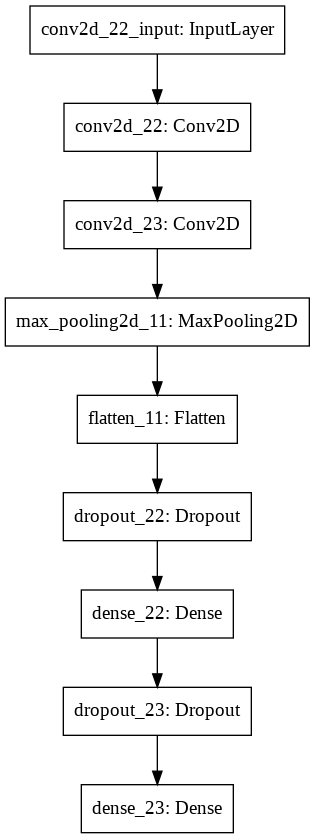
今回は1DCNNを利用します。モデルの構成は下記です。

具体的なコードは下記です。
|
1 2 3 4 5 6 7 8 9 10 11 12 13 14 15 16 17 |
model = tf.keras.models.Sequential([ tf.keras.layers.Conv2D(32, 3, activation='relu', input_shape=(28, 28, 1)), tf.keras.layers.Conv2D(64, (3, 3), activation='relu'), tf.keras.layers.MaxPooling2D(), tf.keras.layers.Flatten(), tf.keras.layers.Dropout(0.25), tf.keras.layers.Dense(128, activation='relu'), tf.keras.layers.Dropout(0.5), tf.keras.layers.Dense(10) ]) model.summary() loss_fn = tf.keras.losses.SparseCategoricalCrossentropy(from_logits=True) model.compile(optimizer='adam', loss=loss_fn, metrics=['accuracy']) |
4 モデルを学習する
|
1 2 3 4 5 6 7 8 |
ts = [] ts.append(time.time()) model.fit(x_train, y_train, batch_size=BATCH_SIZE, epochs=12) ts.append(time.time()) print('Fitting time: %.1f (sec)\n' % (ts[-1] - ts[-2])) |
5 モデルの精度を検証する
|
1 2 |
res = model.evaluate(x_test, y_test, verbose=2) print('model accuracy %s \n' % res[1]) |
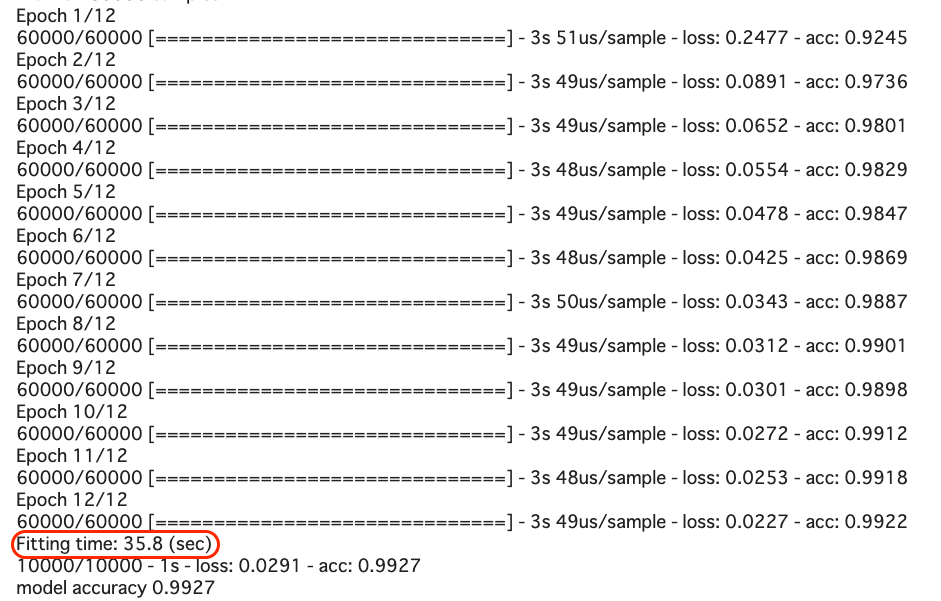
検証結果は下記です。

モデルの学習時間は35.8秒、精度は0.9914です。
TensorFlow 1.xと比較してみると
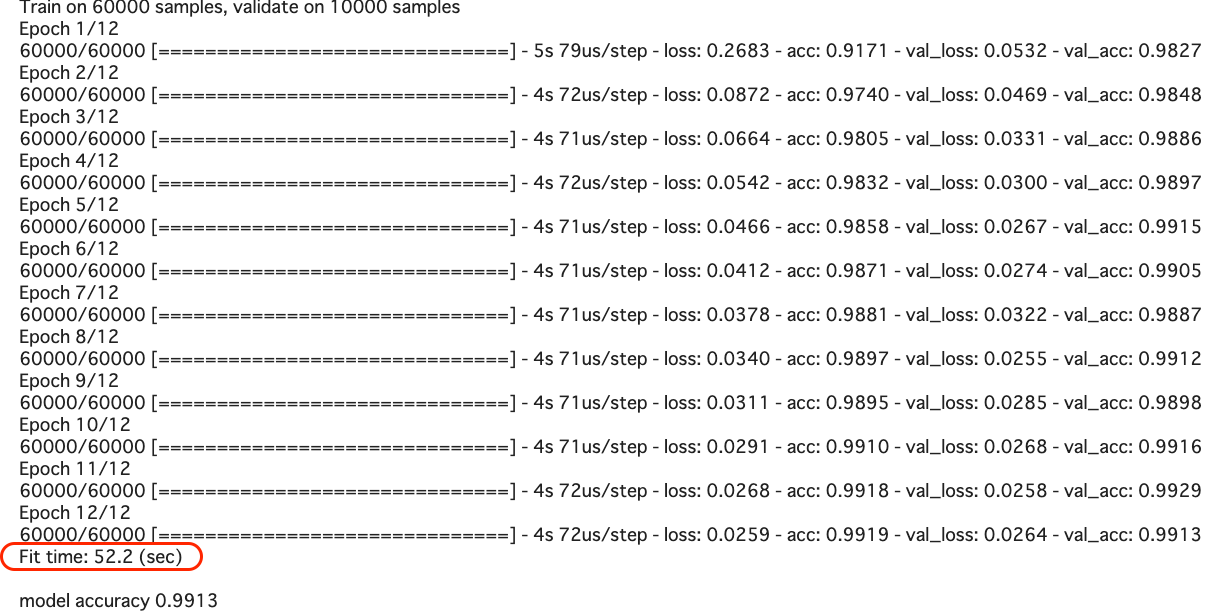
同じモデルでTensorFlow 1.x版のコードを書いてみました。
 精度はTensorFlow 1.x と2.0では0.9913と同じくらいでしたが、モデルの学習時間は52.2秒から35.8秒と大幅に短縮できました。
まとめ
今回は、TensorFlowが1.0より改良された点と簡単な例をご紹介しました。
TensorFlow 2.0は、良い機械学習のモデルを作るために必要な、重要な処理ツールの一つです。
今回のブログが皆さんの機械学習に関する開発のお役に立てば幸いです。
TensorFlow 2.0は、良い機械学習のモデルを作るために必要な、重要な処理ツールの一つです。
今回のブログが皆さんの機械学習に関する開発のお役に立てば幸いです。


